Bullet list on iOS with TextKit
In a recent project, I needed to display and edit bullet lists on iOS, i.e. as part of a rich text editor. After rounds of searching on Google and Stack Overflow, I could not find any satisfying answers. The most common solution is adding a bullet character right in front of each item in the list, which is good enough in most of cases, but not in mine. So what exactly are my requirements? Quite straightforward, just few things:
- First, of course, display a bullet list.
- When changing text alignment, bullets are still aligned nicely on the left side, regardless of the alignment which can be left, center or right.
- Last but not least, the ability to edit the list, i.e. edit, add or remove list items without the hassle of handling characters manually.
With that in mind, I will go from the common solution mentioned earlier to the final one in this post.
The common solution
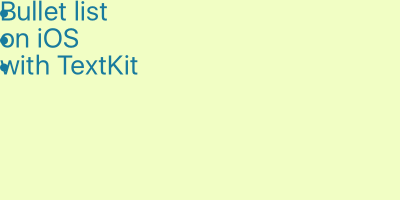
To be fair, this solution is simple yet efficient in simple use cases. The idea is prepending a bullet character (•) to every new item which leads to the following.
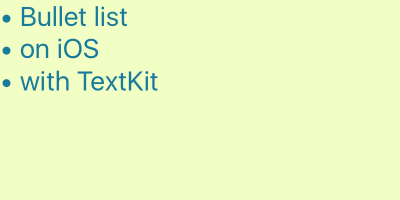
To display the above list, the string underneath would be:
• Bullet list\n• on iOS\n• with TextKit
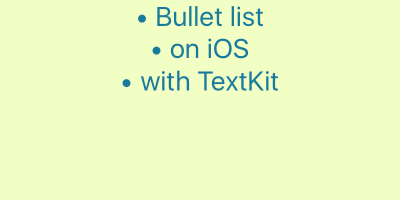
This looks great when left aligned and easy to make, so no complaints at the moment. Let’s go ahead and change to center alignment.
And right alignment.
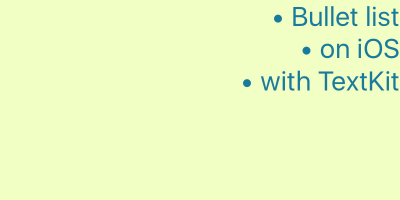
Wait, the bullets should vertically align each other, shouldn’t they? Nice catch, and they should keep intact on the left side as well. Because we include the bullet in the item and treat it as the item’s content, no wonder why this happens. Another problem that does not show itself visually: when we edit an item, we can actually remove the bullet character and the space between it and the text. Moreover, when we add an item, the bullet does not come for free, we need to prepend it again to the new item’s content. That being said, it is solvable by manually handling the editing action, both for adding a new item and removing an item, which does not appeal to me. There must be a better way.
So far, we have a nice way to display a bullet list on left alignment, with limitations on other alignments and tedious editing approach.
First attempt, draw bullets
Usually, we should address problems one by one, divide and conquer. However, in this situation, we can kill two birds with one stone as they boil down to one actual problem. Should we consider the bullet character as the item’s content? That is the root question for this problem. Undoubtedly, the answer would be a big no. Since we analyzed it earlier, if the bullet character is a part of an item’s content, more effort is needed to handle it properly and this process is error-prone. Better to let the system do its job unless we have a really special need. With that said, we have already eliminated one problem which is to manually handling editing, and direct all focus to the other problem.
You might think: too many words, too much explanation, where is the code, how to use TextKit?
Wait for it, here we go. For the sake of brevity, I will not introduce TextKit and its components, but will explain it with usage and only the parts used to solve the problem. However, it is worth to quote the following statement from Apple’s documentation to understand the concept of TextKit.
In Text Kit, an
NSTextStorageobject stores the text that is displayed by aUITextViewobject and laid out by anNSLayoutManagerobject into an area defined byNSTextContainerobject. And here is the relationship between them.
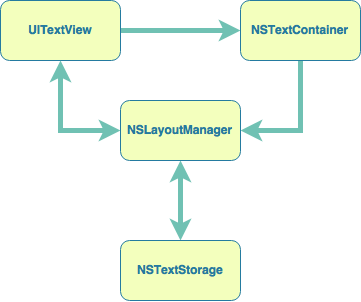
What we are trying to do is drawing a bullet in each item. We have three candidates to look into: UITextView, NSLayoutManager and NSTextContainer. Among these, NSLayoutManager is the most promising one. We pass on NSTextStorage because its name implies its job is related to text storage and we do not touch the text in any way. There are a bunch of methods in NSLayoutManager, we do not know which one to use to achieve our goal. Most of them have glyph or line fragment in their name. In typography, a glyph is an elemental symbol within an agreed set of symbols, intended to represent a readable character for the purposes of writing (Wikipedia). Line fragment is the extent in which a line is drawn. To draw our bullets, we need to know where to draw it and line fragment could be a hint. We will draw it on the left side of each line fragment. Fortunately, NSLayoutManager allows us to do both of these, doing custom drawing and obtaining line fragments via.
drawGlyphs(forGlyphRange:at:)
Draws the glyphs in the given glyph range, which must lie completely within a single text container.
enumerateLineFragments(forGlyphRange:using:)
Enumerates line fragments intersecting with the given glyph range.
We will subclass NSLayoutManager to override these two methods and bring the bullets to life.
class BulletListLayoutManager: NSLayoutManager {
    let bulletSize = CGSize(width: 10, height: 10)
    let bulletColor = UIColor(red:0.14, green:0.48, blue:0.63, alpha:1.0)

    override func drawGlyphs(forGlyphRange glyphsToShow: NSRange, at origin: CGPoint) {
        super.drawGlyphs(forGlyphRange: glyphsToShow, at: origin)

        enumerateLineFragments(forGlyphRange: glyphsToShow) { (rect, usedRect, textContainer, glyphRange, _) in
            let origin = CGPoint(x: 0, y: usedRect.origin.y + (usedRect.size.height - self.bulletSize.height) / 2)

            self.bulletColor.set()
            UIBezierPath(ovalIn: CGRect(origin: origin,
                                        size: self.bulletSize)).fill()
        }
    }
}
Pretty simple, right? One thing to note here is the calculation of y of the bullet since we want it vertically aligned to the item’s content. Another thing worth mentioning is super.drawGlyphs(forGlyphRange: glyphsToShow, at: origin), make sure we do not forget to call it or nothing gets drawn at all.
Now we create NSTextView with BulletListLayoutManager instead of default NSLayoutManager.
let textStorage = NSTextStorage()
let layoutManager = BulletListLayoutManager()
textStorage.addLayoutManager(layoutManager)
let textContainer = NSTextContainer(size: .zero)
layoutManager.addTextContainer(textContainer)
let textView = UITextView(frame: CGRect(x: 0, y: 0, width: 400, height: 200),
                          textContainer: textContainer)
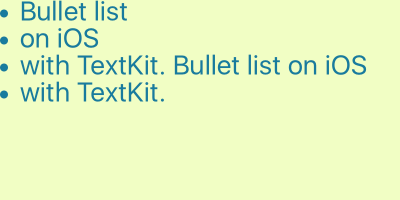
The relationship between these components guides us to create and assemble them to create an NSTextView with the underlying BulletListLayoutManager which again is used to draw bullets. Up to this point, we have our first result.
Indentation
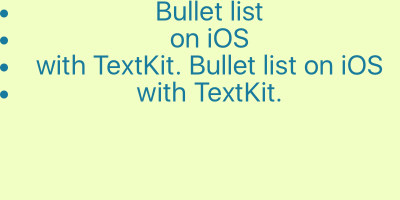
We have drawn bullets and have them beautifully in place without any additional characters added to the item’s content, but we are not done yet. Look at the result above, you will probably notice that the bullets are overlapping the item’s content, not what we want. On the bright side, just a small adjustment can fix this. Did you know that we have control of the indent of the first line and other lines in a same paragraph by just using attributedText of UITextView? With this great support from TextKit, it is easy to shift the right item’s content and leave a consistent space between it and the bullet.
let style = NSMutableParagraphStyle()
let string = "Bullet list\non iOS\nwith TextKit. Bullet list on iOS with TextKit."
let attributedString = NSMutableAttributedString(string: string)
let range = NSRange(location: 0, length: attributedString.length)
style.firstLineHeadIndent = 20
style.headIndent = 20
attributedString.addAttribute(NSParagraphStyleAttributeName,
                              value: style,
                              range: range)
textView.attributedText = attributedString
Here we set the same indent for the first line and other lines onwards, and apply this style to the whole list to ensure we have all lines left aligned.
Let’s test with center and right alignment.
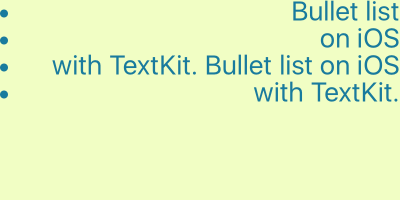
Wrapped item
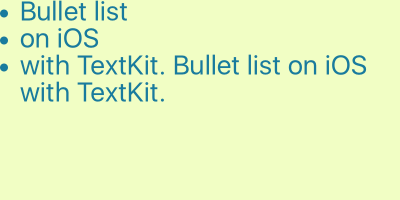
We are almost there, just one final step. Again, look at the result we have previously, could you find anything weird? Hint: We have only three items in the list. “So where is the fourth bullet come from?”, you asked. Bingo, you got it. The thing is the last item is wrapped to two lines and due to the way we draw bullets, there is one corresponding bullet for each line. Ideally, each item should only have one bullet, regardless how many lines it contains, thus we only have to draw one bullet for the first line, a.k.a the line fragment of each item. Sounds simple but how do we determine whether or not a line is the first one or second in an item? Hint: Using the new line character. Let me recall the underlying string of the list.
Bullet list\non iOS\nwith TextKit. Bullet list on iOS with TextKit.
From the second item, its first line is the one with the new line character \n immediately before its content. Now we can update the previous code to adapt to this scenario.
class BulletListLayoutManager: NSLayoutManager {
    let bulletSize = CGSize(width: 8, height: 8)
    let bulletColor = UIColor(red:0.14, green:0.48, blue:0.63, alpha:1.0)

    override func drawGlyphs(forGlyphRange glyphsToShow: NSRange, at origin: CGPoint) {
        super.drawGlyphs(forGlyphRange: glyphsToShow, at: origin)
        guard let textStorage = self.textStorage else { return }
        enumerateLineFragments(forGlyphRange: glyphsToShow) { (rect, usedRect, textContainer, glyphRange, _) in
            let origin = CGPoint(x: 0, y: usedRect.origin.y + (usedRect.size.height - self.bulletSize.height) / 2)
            var newLineRange = NSRange(location: 0, length: 0)
            if glyphRange.location > 0 {
                newLineRange.location = glyphRange.location - 1
                newLineRange.length = 1
            }
            var isNewLine = true
            if newLineRange.length > 0 {
                isNewLine = textStorage.string.substring(with: newLineRange) == "\n"
            }
            if isNewLine {
                self.bulletColor.set()
                UIBezierPath(ovalIn: CGRect(origin: origin,
                                            size: self.bulletSize)).fill()
            }
        }
    }
}
We treat the first line fragment as a new line by default. For the rest lines, we get the character right in front of the content of that line, then check if it is \n. Here we are, our final result.
Conclusion
I have walked you through the whole process, from thinking, making decision to implementation that was exactly in my mind while I was doing it. This is, however, just the beginning, there are still lots of room for you explore TextKit, tweak it and make it your own solution to your problem. I can name some remaining things to improve and leave them as exercises for you.
- Change bullets size according to font size.
- When we change line height, content does not align to the bullet anymore, we need a fix for this.
- Instead of black dot bullets, can we make other types of bullet?
Behind the scene
I obscured some of the code to keep the post focused on what matters. However, it is a two-bladed knife, while it is short, it may perplex you, so it is better to uncover everything. There are two things I did not mention throughout the post. The first one is the text view and the style have been preconfigured as below to simplify the implementation of BulletListLayoutManager.
textView.textContainerInset = .zero
textView.textContainer.lineFragmentPadding = 0
textView.layoutManager.usesFontLeading = false
style.minimumLineHeight = fontSize
style.maximumLineHeight = fontSize
And if you notice, string.substring() only accepts Range<String.Index> as parameter, not NSRange. I created an extension of String with NSRange support so that the method works seamlessly with NSRange.
extension String {

    func substring(with range: NSRange) -> String {
        let startIndex = index(self.startIndex, offsetBy: range.location)
        let endIndex = index(startIndex, offsetBy: range.length)
        return substring(with: startIndex ..< endIndex)
    }
}
References
I recommend you to go through the following references, they are great resources, talks and libraries that helped me a lot to realize this idea.